
Long before I contemplated painting Brunnhilde's exterior plastic trims I priced the cost to replace them. If memory serves the total cost of all the bumper fascia, end caps, and the two rear wheel arches totals about $1700. At the time I thought I might just spend the money to restore the fresh look. However I consider that how poorly they stand up to the elements I decided $1700 is a poor investment having to replace them every 5 years or so (judging from the rate of fading I observed). I decided to paint them instead.
A number of neighbor walked by and saw my project. In two separate occasions the person commented that if I was preparing to use Rhino truck bed spray. I explained that I want to retain the orignal factory look and I thought to myself, only if they realize the complexity of what it all entail with professional automotive paint finishing.
i managed to took a break and made some grilled oysters for lunch


After baking in the sun a few hours the painted plastic fascia is quite safe to be handled. I begun to put the front fascia back. Wait! What did I just type? I just realize there is really no front bumper on the Sprinter. The front bumper looking thing is just a plastic fascia made-believe prop like used in Hollywood movie sets. Behind it is every thing you want to avoid at all cost of even hitting something even at very low speed. The front sheet metal of the unibody is designed as a energy absorbing crumble zone. Same with the rear end.
Though on the rear bumper fascia there is a bit of plastic insert that can absorb some energy if the impact is square. The sheet metal of the unibody there has nothing substantial to support the plastic bumper. Even the two major mounting points for the bolts are not reinforced. Even a very low speed impact given the mass of our Sprinters the damage will always very substantial and very costly to repair.
As I have written, I have no plan to put the chrome front license plate bracket back. To this Chrysler threw me a curved ball. I only realize this while putting the front bumper back. On the Mercedes cum Dodge rebranding the US sprinters gets this license plate bracket as add on. It provides the mounting for the ambient air temperature sensor. The harness assembly feeds through a 1 5/8 inch hole which is unclear to me if it is originally on the European Sprinters. To address this I have to devise a home made mount for the sensor at where this hole is.
the ambient air temperature sensor mount is the small round hole on the chrome bracket

Judging from the appearance of the holes on the bumper fascia, it may be there all along to accommodate another insert that provides the mounting for the sensor, and to protect it from the elements while shielding from the radiant heat from the hot pavement in hot weather. To find out I need access to the European parts manual or service manual.
here is how it look now


there is many challenges being a shade tree autobodyman not having the experience of the professionals; how much flattener to add to the paint is one such example; fortunately the ratios given in the data sheet turns out to be quite accurate - at least for my notion of what is semi-gloss

putting the wheel arch fascia back on took no time at all - i don't plan to put the big mudflaps back on


everything back on except the rear bumper pieces

I cannot stop admire how much better the appearance now. I now want to invest about $100 to buy the 4 plastic MB center caps for the steel wheels. I should add that none of these photos give accurate rendition of the actual color I used due to the sunny day. I will add a more accurate photo later when I have a chance to take one under an overcast sky.
Today after breakfast I will put the rear bumper pieces back on to conclude this project.
Putting the rear bumper and end caps back onto the vehicle is a bit of challenge. You have to first assemble the interconnect pieces which consist of the main bumper, and the two end caps and the two internal honeycomb impact elements. It took me a bit of time to figure out how best to do this without scrubbing up the new paint finish as the only way the assembly will stay put is to rest on the painted surface.
one of the two internal honeycomb impact element for the end caps

The key to getting the pieces back on is to first rest the assembly on top of the trailer hitch, then carefully guide the end caps onto the channels of the plastic support on each side of the vehicle. Once you double check the end caps are properly engaged with the tracks you then push the main section straight in horizontally while careful not to stress the end cap assemblies.
This is followed by carefully checking the alignment of the plastic tabs with the slots on the sheet metal. Next is to go around to find the locations of all the plastic tabs and tap the bumper with a strong and determine smash of your palm. Then double check the end caps are squarely in place, before installing the two retaining bolts for the main section.
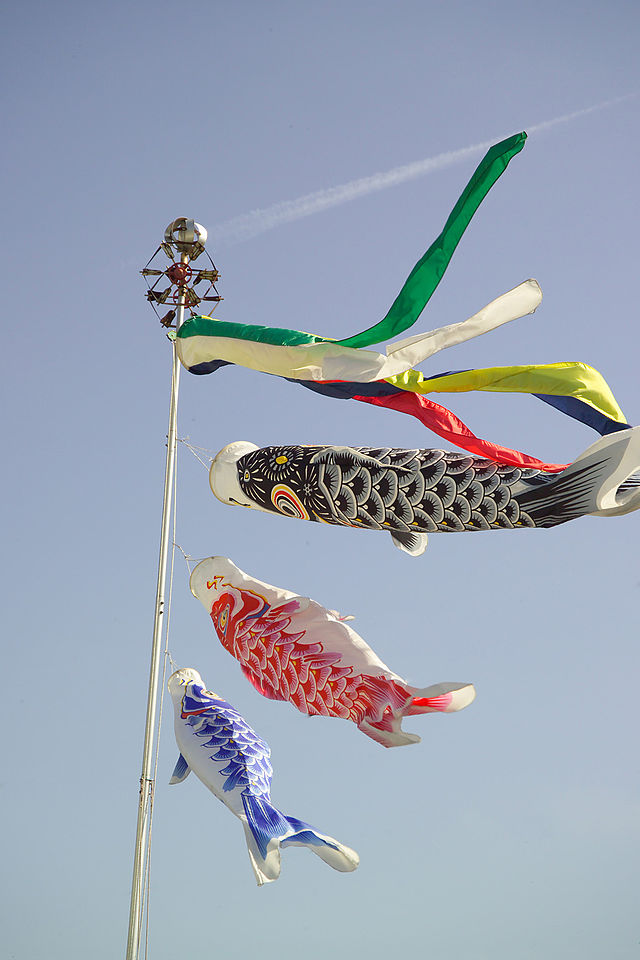
All done just in time for the Japanese Childern's Day Festival on May 5th - note the carp streaming that I hung in front of my house. Some day I want to get the supersize one that is 3 meter long and costs a few hundreds of dollar.
just in time for the Childern's Day Festival

There is a small side project that I think will greatly improve the look. I have some paint left over in the spray gun and want to take advantage of it. I am considering painting the accessory ports located at the left rear. These are the North American specific RV ports that are currently in a jumbo number of colors - black, beige, and grey. To paint them I need to remove them from the vehicle. Seeing you cannot access them inside the vehicle I am afraid to loosen the screws and have the inner pieces fall off into the abyss. More investigation needed.
While reading my own post and was looking at the photo of the license plate bracket, I realize I can make lemonade with lemon in fashioning my own mounting solution for the ambient air sensor. To properly mount the sensor it needs to reside in a deep well protected from direct impact from road debris, while expose to moving air when the vehicle is in motion.
I can cut out the portion of the bracket that including the sensor well and the surrounding section of the area. that will give me the mounting mechanism which forms by the plastic push-pin fastener, and the ambient sensor connector which locks to a properly sized hole.While the out out piece of plastic will be very unsightly, it is all too simple for me to make a custom cap with fiberglass.
a possible cut out outline

On the temp sensor: consider just zip-tying it in place behind the bumper somewhere. Keep the chrome license plate holder in case you ever need to return to stock.
ReplyDeleteOn the RV ports: you'll find that the city water and 110V connectors are very nicely fitted (done in Germany) with machine screws into riv-nuts. All fine. The cable TV / phone port, however, will shock you. That is just a butchered household "outdoor" electrical outlet attached with self-tapping screws straight through the sheet metal...
Thanks for your comments. Your remarks on the utility ports are exactly what I found today. All are not bad as done by Westfalia. The communication port no doubt is Airstream's underground abortion clinic quality hack job. What a horror! I made do, making lemonade out of lemon. All painted now to obscure the eyesores.
Delete