
Plastic laminate chips extremely easily. More so I have cut the frame into very narrow strip on the top side. While table saw give you a very uniform and square cut, it has drawbacks. In this case since I am enlarging the inside of the frame the blade cannot finish the cut.
I was looking at the electrical harness for the old fridge, and I thought, perfect, I can repurpose the DC harness for recharging the starting battery. This will save the need to run a new medium gauge wire and there is already a fuse. I think the fuse box is the one behind the driver seat that is not too good so I would replace it with a contemporary blade type holder by Heller.
the DC harness to be repurposed for battery charging of the starting battery


i replaced the purple color fridge light with one that is warm white - by hard wiring it in

making duck confit

with each batch of duck confit i made, i increase my collection of duck fat - which I keep in a coffee tin in the fridge


my precious duck fat

duck is one of the leanest kind of meat

i crisp up the skin under the infra broiler - i am mouth watering already


the support shelf for the fridge requires a lot of work still


i have to keep adjusting the shelf height until i succeed in reaching the need space on the top to accommodate two metal trim pieces

here i am still

only once i am sure the fridge is at the final installation height WRT to the cabinet cavity could i make dimensional measurements to modify the face frame

stripping out the inner bumper moldings

visualizing the new storage opening that is repurposed from the existing opening of the face frame

routed the let-in for the fridge bottom hinge and the door support guide

the front of the fridge has a layer of additional sheet metal and tape so i have to route out the front of the shelf so the fridge will seat plumb

now i knew the precise height of the shelf - i could cut the real bottom support out of 1/2 inch plywood


making the curved back to conform to that of the cabinet - that is a French curve


duck confit with spaghetti

caught a pest out in the yard - he obviously like duck confit too

more fussing to make cuts for the face frame where the steel grate meets the plywood face frame

the plywood stiles that secures the fridge as well as the face frame; it mounting is critical as it affects the alignment of the face frame


here one can visualize what the final appearance of the bottom storage

alas, my hope to store a Korean butane stove did not materialize; it is shy a whopping 1 1/2 inch in height at the opening

cutting the face frame - i raised the blade to as high as it goes in the final pass

the nice 80-teeth cross cut blade cuts the plastic laminate cleanly without chip without the need to protect with masking tape
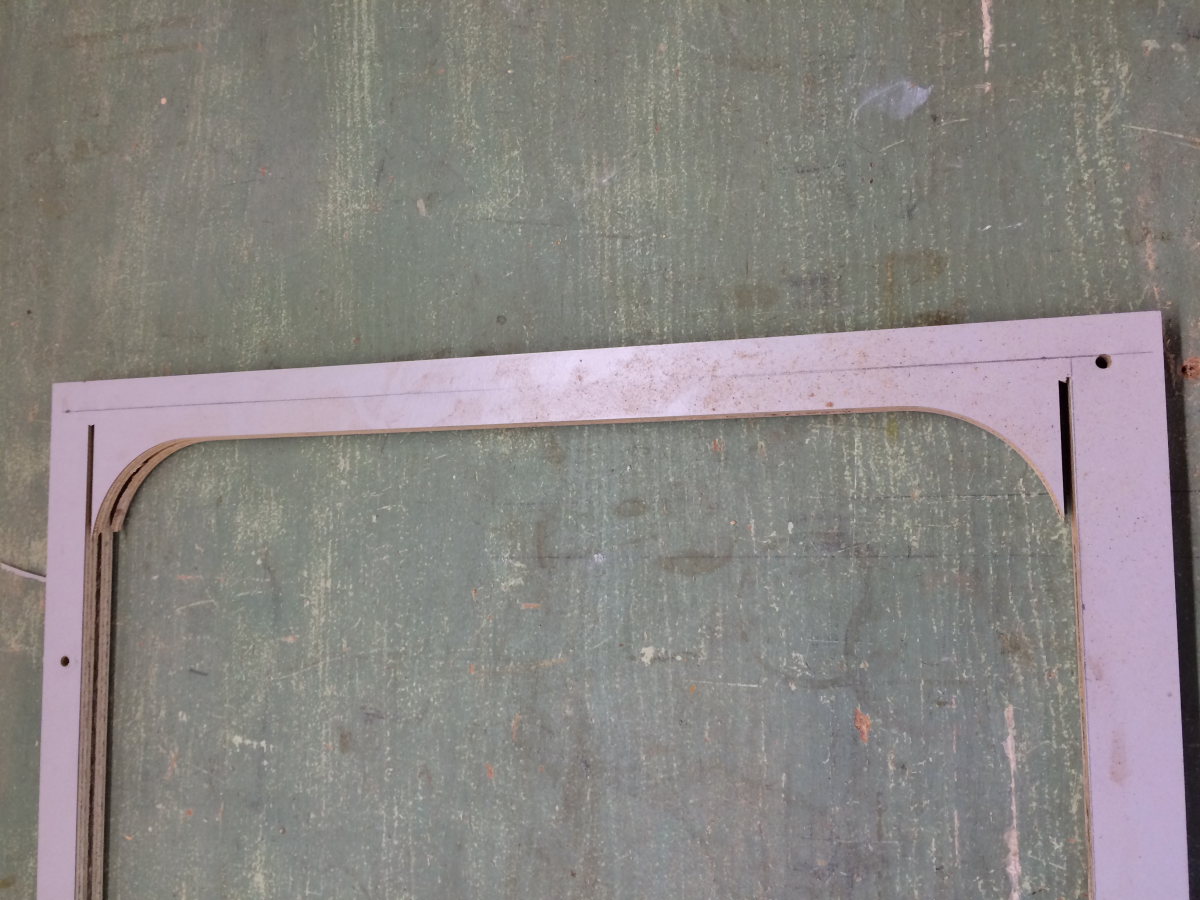
the table saw cannot quite cut it square - even with the blade fully raised

to finish the square cut to achieve square inner corners i broke out the Fein (Fein means fine in German) Multimaster

a truly fein tool

i notice this subtle detail Westfalia did - there is a very thin and shallow saw kerf between the laminate front and the steel ventilation grate for aesthetic reason; impressive attention to details

it turned out my steel grate is offset by about 1/16 inch making the top to bottom gap between the two adjoining panels uneven; to rectifier this i have to elongate the four screw holes on the steel grate so i could shift it laterally to center it

i need to create a backstop for the new storage below the fridge to prevent thing from falling into the back where the insulation is; i repurpose this 4" aluminum dryer vent pipe from my metal scrap heap - i am doom to be a pack rat

my cut was perfect and it just slipped into the gap between the shelf support and the factory 1/8" plywood backstop

i reuse a bit of the inner bumper molding for the edge of the new storage opening

i carefully drilled the four front mounting holes into the wood stile through the face frame; the holes must be perfect and the fridge square WRT to the face frame


one of the mounting holes for the fridge frame happened to be so close to the factory mounting hole that the hole is already too large for the stainless steel countersink screws that i use; i repair it too with the glass fiber and epoxy; the screw above is after i relocated it higher

a stewed rump roast - so much umami

I am just waiting the Epoxy to cure and to mount the fridge a final time...
more photos for posterity


the hard work of mounting the refrigerator is now over; the audio system and cabin battery system update should be a lot easier

before:

unapologetically Formica - with a hint of Memphis Group's design aesthetics; i am glad that I went with my idea to make the refrigerator an accent to the otherwise restrained interior; i also like how its projection over the factory kitchenette giving it added visual interest; the projection obscures the storage space underneath so it all work out

clothing graphic prints by Memphis Group designer Nathalie Du Pasquier


i think these square head countersink stainless screws look fine without any need to obscure them

The mounting of the refrigerator went as well as I could hope for. It is very much what I envisioned in the design concept. The new storage turned out not as tall as I imagined. My sketch of a access port (without door) with 4 corners with the same radius as the factory drawers and cupboard doors is unrealizable as there would need to be a lot more height. Instead I utilize the two lower corners of the original refrigerator opening and that work out well.
What drove my decision is my wanting to have an unbroken seam where the fridge face frame meets the adjacent one for the drawer and cupboard. I am extremely pleased with how this turned out. I think I am going to put some beers into it and do some drinking and testing.
well, the beer bottles are too loose storing this way

i put them in a box to prevent them rattling

In this entire project, the only things that I bought was the refrigerator, the paint supplies, and the Formica plastic laminate that I special ordered. Everything else were what I have on hand at home. When I need something, I first try to see what I can use from my collection. Very often I will modify my ideas and solutions to adapt to what I have instead of running to the store. What inspire me in this approach is farmers and ranchers who live in the country, and are force to become ingenious in mending everything.
On the original cooling vent port on the left side of the kitchenette cabinetry that I planned to block to further muffle the compressor and the cooling fan, I am considering a suitable repurposing. I am considering turning it into a 12Vdc power panel - something I initially rejected for the seeming likely interference with the dinning table when stowed. However examining closer of the articulation of the table I realize it is very well behave. The vent port opening can afford a aluminum plate with say 4 outlets with two above the table and 2 below the level of the table top. I already have a power panel like this in Isolde that I installed circa 18 years ago on the B pillar by the sliding door.
The reason to have so many outlets are I wanted to be able to selectively consume from the coach or cabin battery. To have the power panel at the now defunct air vent opening is ideal without the problem of running cables across the floor when I want to power mobile devices.
Charles Eames once said, good design usually results from most difficult of constraints.
Excellent attention to detail - meets or exceeds Westfalia's high standards! Congratulations on another well done enhancement!
ReplyDeleteJohn. Thanks for the kind comment.
Delete