This is the make or break step of the installation of the Coleman Mach 8 Cub air conditioner. Everything hinges on the planning, design, and fabricating of the roof support. One of my criteria is to avoid drilling new hole and making cutouts to the extend possible. If possible, I would make my conversion work reversible - within reason and design tradeoffs.
to save time and effort in filing smooth the cutout I really abused this grinding disc; no big loss as it was already passed its useful life so it actually went to a good cause
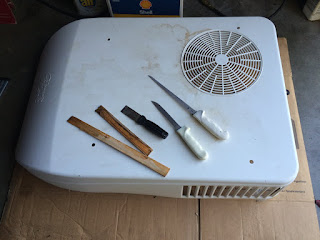
removing the raised plastic frame involves some of my best knifes
the black rubber-like adhesive has to be the toughest and most impressive that I encountered
there is no point trying to remove the black adhesive as the gel coat will give before it
fate always has a way of throwing you a curve ball - i discovered this delamination only after removing the plastic raise frame; this would set me back 4 hours in a race against the impending rain and diminishing light
sure looks like a bag of coke to boost my productivity - it is micro balloon
it was a calculated risk to do this in air temperature of low 60s (F) as the clamps must come off by 4pm to give me enough time to seal up the roof before dusk
sure enough my calculated risk paid off - with slight increase of the catalyst the repair was made; at 4:30pm I was able to remove the clamps to carry on with the installation of the aluminum sheet onto the roof top
it was a race against the fast setting sun - the forecast for is 100% chance of rain the following day; failure is not an option!
just at dusk I managed to locate all existing 6 holes to drill them and installed the aluminum plate onto the roof with sealant and caulking; the exacting location of the aluminum plate ensures the AC can be installed without any interference to nearby raised features
mahi mahi with clam sauce and baby bokchoy for dinner after a hard day's work
The design, fabrication, and installation of the aluminum plate is the most difficult step of the air conditioning conversion. Everything else would feel trivial from this point onwards.
The proof of the pudding is if any leak develop. The rain in the following days would sure be the acid tests to reveal any.


Looks great!
ReplyDeleteExcellent that you got the Kerstner flange off in one piece. Out of curiosity, are there any manufacturer markings or part numbers on it?
That black stuff is probably just Sikaflex 221. It is indeed excellent stuff.
Ted,
ReplyDeleteIt was quite hard initially. I have to jimmy in between the tight gap with a thin putty knife. I had to push so hard that my palm hurt. Once I cut a few inches I switched to the thin fillet knife. I slid in cedar shims along the way to reduce the friction.
I just look and cannot find any marking. It is likely a standard install part from Kerstner. Our Kerstner seems to be a derivative of roof top AC for commercial vehicles.
Did you see my recent comment about the Sprinter-Westfalia get together planned for this coming weekend (Nov 13 - 15) at Fort Casey on Whidbey Island, Washington? I know there is one other Portland based owner coming up. I'm sure many would like to see your modifications.
ReplyDeleteHi Leslie. Alas, giving the current dismentaled state of Brunnhilde - there are still much wiring and electrical work to be completed, I do not think I would be able to meet up with you. Thanks for the invitation.
ReplyDeleteThis weekend would certainly have been a test for your waterproofing! We had a great gathering and a fun potluck on Saturday night. Hope to meet you one of these days!
ReplyDeleteJohn, Good to head you all have great fun at the gathering. There must have been no less of downpours where you camped - so close to the Olympic Rain Forest. Surprisingly, we didn't receive as much rain as forcasted. Saturday was all dry.
Delete