Monday, May 16, 2016
a multi-function display for isolde - part 1
The idea of a multi-function display for Isolde came to me quite accidentally. It started from when I decided to play with the Arduino microcontroller board. In anticipating its arrival via long shipping time from China I tried to prepare for what simple programs to write. I found this LCD display that I have at home since circa 1994 without any expectation it is of any good or I can find datasheet for it.
As soon as the Arduino Uno arrived I blazed passed a few most elemental programs and in no time I was ready to have some fun with a display and play with the multitudes of analog inputs. A number of needs in Isolde were staring at my faces since I designed and installed a cup holder system. I have a vague notion of using the cup holder mounting rail as an accessory "toolbar" for mounting compact devices like a surplus iPhone for used as smart instrument.
Isolde's cup holder accessory track
As I played with the LCD display, I realize how much I like it and thought it would make a nice multi-function display for Isolde to display addition vital parameters like oil pressure and temperature. I spent some time this past weekend proving out the design of hardware and software and I really quite pleased with the result.
I actually have this two gauges on hand but I would rather have this multi-function display to avoid creating a ghetto of gauges
Here are the three posts on my venture into the Arduino Uno:
invested in a microcontroller board - part 1
invested in a microcontroller board - part 2
invested in a microcontroller board - part 3
The tendency with playing with microcontrollers like the Arduino one can so easily fallen into the trap of creating solutions in search for problems. The slippery slope of more the better, and more complexity means better design and lost sight of usability and human factors. The tendency is to call upon a bigger touch screen display and throw in all the bells and whistles.
I try to avoid these traps. I want a simple instrument that is not distracting when driving. No user control, or if any, just a most elemental one. Originally I was quite looking forward to play with a miniature OLED display for the potential use of this application. It is still in transit from China. Having tested out my LCD display I have really warmed up to using it instead because of it excellent display attributes. I am now start thinking ahead as how to package the electronics to have the most compact device for the accessory toolbar. I am thinking of to package just to LCD display alone as the only visible part and hide away the Arduino Uno and the associated electronics. Instead of using my existing LCD I can purchase a similar one from China with I2C interface to significantly reduce the number of wires between it and the Arduino Uno. A reduction from 12 to only 4! The trade off is slightly slower display update rate due to the slow I2C serial bus.
The advantage of the I2C version of the LCD display is the ease to construct a pleasant looking enclosure for it as well as fitting into the tight confine of the area near the driver and still afford the articulation of the RAM Mount ball joint holding arm.
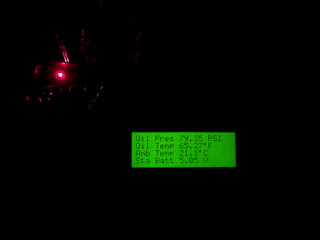
my working prototype of the multi-function display for Isolde
what it looks like in pitch darkness - except the actual color is a pleasant yellowish green that compliments the yellowish white of the Vanagon instrument cluster; I cannot color-correct this JPEG photo taken by the iPhone and I don't feel like bring out the Canon DSLR that supports RAW
Isolde's instrument cluster
One of my wishlist function for this multi-function display is a data logger. To add this feature some sort of input devices are needed to interact with the user. This goes against my firm self-imposed constraint of minimal driving distraction. My current thought is the used of either a 2-bit rotary encoder or a simple joystick, which can be mounted discretely to support these non-driving functions. A data logger function is most indispensable when one need to identify the source of shake and vibration when the vehicle is at speed, or just to log the refrigerator's temperature and on time through a range of outside temperature. Additionally, the addition of a real time clock calendar chip will make the multi-function display that much more intelligent. The possibility is endless.
I ordered a Arduino compatible RTC (real time clock) and SD card shield for the implementation of a data logger and it should arrive soon. I am itching to get on with the endless fun project. Of all things that I bought these have to be the most fun per dollar. All are just more software design and implementation.
The orders of additional Arduino tinker toys just arrived. I cannot contain my excitement, like a boy waking up on Christmas morning.
a 37-piece sensor kit and a prototyping kit with breadboard and jumpers
inside the 37-piece sensor kit
even comes with a depiction of what sensor is in each compartment
this is the joystick that I have been looking forward to; it turns out to be a real x-y axis joystick with real potentiometers and a center activation switch - perfect!
slight assembling required - it feels good to move the stick as well as the press to activate switch
I did a quick check on the joystick support library. It needs one digital input and 2 analog inputs. All of which are still free on my Uno. Even if some are I can reassign them if needed. Adding the joystick control would make for a much more interesting programming as there would need to have interrupt handling routines.
the prototyping kit
Young people today are so fortunate. Learning programming, or anything are so effortless and hardware components are so cheap due to globalization and the vibrant internet and free flow of information.
Update:
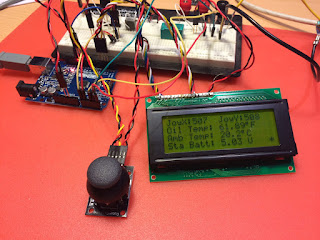
I wired up the joystick and verified its functionality. There is no trimming provision for the two potentiometers, but I am impressed with how well both X and Y centers are. Here is a photo which the joy stick X-Y positions are shown on the top row of the LCD display.
x and y position of the joystick is shown on the top row
I also wired up this nifty temperature and humidity sensor - the blue thing on the bottom left; the humidity and temperature are shown in the third row of the display
At this point, I am undecided if I should include the joystick into the system for user interface navigation.
Subscribe to:
Post Comments (Atom)


No comments:
Post a Comment