Unzufrieden - is one of the German vocabulary that I recently learnt. I thought I would made it a title of a post. Warum nicht.
With Isolde's electrical system update project close to completion I went shopping but was really an excuse to go got a tide in Isolde.
Thai basil port with long beans; here are all the ingredients prepared and ready to be cooked in my outdoor kitchen; preparation is 90% of the work
I went for a drive in Isolde after fabricating the battery hold down for the two group 24 deep cycle batteries. I went to the Korean supermarket H-Mart as I promised two of my windsurfing friend that I would pick up the windscreens (for butane stove) for them. While I was there they have the mini butane stove and I bought one for Isolde. I also bought a sauce pan for her as well. I have been curating a collection of cookware and silverware for her.
a light weight sauce pan and a mini butane stove I picked up at the Korean store
The butane stove does not replace the two Westfalia propane cooking hobs. It augments them in meal preparations. I use the butane stove outside for cooking steps that involves frying or generates a lot of smoke. Oil vapor is the most damaging to the interior and the odors will stay with the vehicle forever. The butane stove is also an indispensable backup should I find myself out of propane.
From the beginning of the electrical system update for Isolde, I have decided to take full advantage of the air vent cutout of the Vanagon heater blower. I let the ideas simmered during the process. By the end of the project it is crystal clear as how I can best utilize it. I want to take advantage of the large area for a number of electrical functions, to house the V/A meter as well as one or two power ports.
While I can settle on a simple flat panel fabricated out of a piece of sheet aluminum, I want to make it much better. Unzufrieden - as the German word for impossible to please. I want to have the cake and eat it too. While I am making a concession of mounting the meter below ideal eye level, I want to make an effort to make it easier to read - by incorporating a slant on the panel so that the meter would be tilled in about 20 degrees.
the old defunct blower heater port to be repurposed for electrical functions - to house the V/A meter and possibly a 12V utility power port
as with most LCD displays the V/A meter has a narrow angle of legibility; hence I wanted to made a recessed panel to mount it on a slight incline
My plan was to fabricate the recessed panel out of fiberglass with polyester resin. My initial idea was to make a supporting mold out of cardboard so fiberglass cloth may be laid on it.
For some reason I deviated from my original plan of making a mold out of cardboard. I thought it would be easier if I can find something at home that has the right dimension and angles. I started scrounging for a ready made mold.
this candy tin box has the right width and radius but the 90 degree angles are too tight
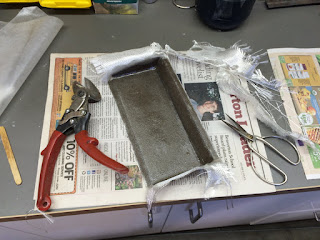
this hardware sorting bin has most of the correct angles and dimensions - i thought i could try using it
the bottom side is not suitable because of the plastic standoffs
i made an improvised dam; i sprayed some silicone lubricant as mold release
i started with only 1 layer of E-glass wanting it to conform to the bends and curves
the silicone lubricant work well as mold release for the plastic tray but not the wooden dam
i managed to trim off the fiberglass at the wooden dam using a mini abrasive disc
i made the flange on the sides that need it
the problem of using the improvised mold is the shallow side tapers inwards forming a trapezoid
i wanted to mix in white pigment into the polyester resin but i don't have any - i would have to paint the finish panel with paint instead
trimming the flange is a trial and error
the problem is the flange is very uneven and wavey and the fiberglass panel would not seat flush to accommodate the steel trim ring; i do not want to carve into the plywood to make it fit
by this time I was very unhappy with this approach - and tire of the miserable work of cutting and grinding off fiberglass; i decided to go back to square one with my original idea of making a mold out of cardboard
it took me about 20 minutes to make this cardboard form - no fancy trigonometry used; projects like this is why I can never throw anything away, even a piece of cardboard from a note pad
this is my first attempt and it is perfect
i started by glassing only one layer as the cardboard form is rather weak and may lose the form when wet by the resin
I let it cure in the autumn sun
two more layer of e-glass should be sufficient
more solar assist exothermic curing
i did the trimming before the resin fully cures as it is easier
i wanted to avoid any abrasion cutting or sanding which is miserable work
i hand trim it to fit - note the sloped sides
i have to drill new holes for the 4 screws as the factory installation of the frame was no uniformly centered; i need it center so there are a uniform gap to accommodate the fiberglass panel on all 4 sides
a set of 4 new screw holes
next I set out to modify the VA meter to install an external push button
i check to make sure the cut out for the meter fits
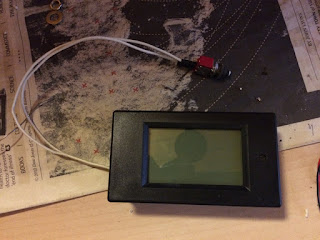
i could see the 4 soldered contacts of the the push button switch on the PCB
10 minutes of work and it is done; the reason for the external button is the one on the right side of the panel is recessed and you have to use a tooth pick to change the settings; an external button make the meter much more user friendly
i grab the first paint spray bomb i could find and put a few coats of paint on the panel; talking about watching paint dry; i only had patience to wait for the paint to become barely tackfree and proceeded to drill the hole for the push button switch
For the entire electrical system update for Isolde, I had work hard to repurpose all the defunct features. The air duct for the blower heater removed initially seem daunting as how I can repurpose it. I am quite please of this execution that maintaind the original integrity and aesthetics. I think Westfalia's designers would be proud.
I fabricated this panel all from material that I have at home. I didn't have to buy anything nor waste time driving to the stores.
i would prefer a coat of grey paint but this has to do for now; the recessed panel also minimize the chance of meter from accidental impact; the white panel, flanked by the black steel trim has the appearance of utilitarian Japanese electronic equipment circa 50s
A little bit about the meter. I think I should refer it as the energy meter. It has 4 functions. It displays the voltage, current being consumed, the instaneous wattage being consumed, and tallies the watt-hour of energy consumed since last reset. It samples voltage and current twice per second. The wattage and watt-hour are computed from voltage and current. The display illumination can be toggled on and off with the push button. It has a user selectable voltage alarm for min and max.
my neighbor was so kind to give me this giant hello kitty when i asked - i told him i brake for hello kitty


The custom meter install is a very nice touch!
ReplyDeleteHi John. Thanks for the complement. I racked my brain out trying to think how to overcome the seemingly impossible solution for the meter below low near the floor. Now I am actually glad it is mounted there out of my visibility unless I seek this information. Sometimes untenable constraints can lead to unexpected windfall.
ReplyDelete